Chocolate‑Dipped Caramel Coconut Bites


🌸 Homemade Chocolate‑Dipped Caramel Coconut Bites (Perfect for Mother’s Day!)

Affiliate Disclosure:
This post contains affiliate links. If you purchase through my links, I may earn a small commission at no extra cost to you. Thank you for supporting my little corner of the internet.


Does your mom have a sweet tooth? There’s nothing quite like a homemade gift for Mother’s Day. Anyone can run out and buy something, but when you make something by hand, it carries a different kind of love. It says you spent your time, your effort, and a little bit of your heart creating something just for her.

And unlike those candies that “melt in your mouth, not in your hand,” these little treats absolutely do melt in your hand — and honestly, that’s part of their charm. They’re soft, gooey, chocolatey, and the kind of bite you pop into your mouth before the chocolate has a chance to escape down your fingers.

If your mom is a fan of Mounds or Almond Joy, I have just the thing for you.

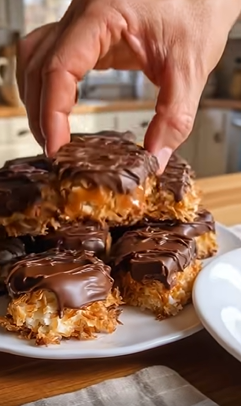
These Chocolate‑Dipped Caramel Coconut Bites are layered, chewy, sticky, sweet, and dangerously addictive. They look fancy, but they’re surprisingly simple to make.


🍫 Minimal Baking, Maximum Melt‑and‑Spread

Although you do need to turn on the oven, the baking here is minimal — just long enough to set the coconut base so it holds together. After that, it’s all melt‑and‑spread magic:

  • Melt and spread the caramel.
  • Melt and spread the chocolate.
  • Chill.
  • Slice into pop‑in‑your‑mouth squares.

That’s it. No candy thermometer. No complicated steps. Just layers of deliciousness that come together with very little fuss.

They’re the kind of treat that looks like you spent all afternoon making them… even though you didn’t.


🥥 The Recipe  Chocolate Dipped Caramel Coconut Bites

These Chewy coconut bites are layered with soft caramel and finished with a smooth
chocolate coating on top. They have a toasted coconut texture, gooey caramel center , and
a rich chocolate finish.

Main Ingredients

• 2 ½ cups sweetened shredded coconut
• ½ cup sweetened condensed milk
• 1 teaspoon vanilla extract
• 1 egg white

For the Caramel Layer

• 1 cup soft caramels or caramel bits
• 3 Tablespoons heavy cream

For the Chocolate Topping

• 1 cup semi-sweet chocolate chips
• 2 teaspoons coconut oil or butter

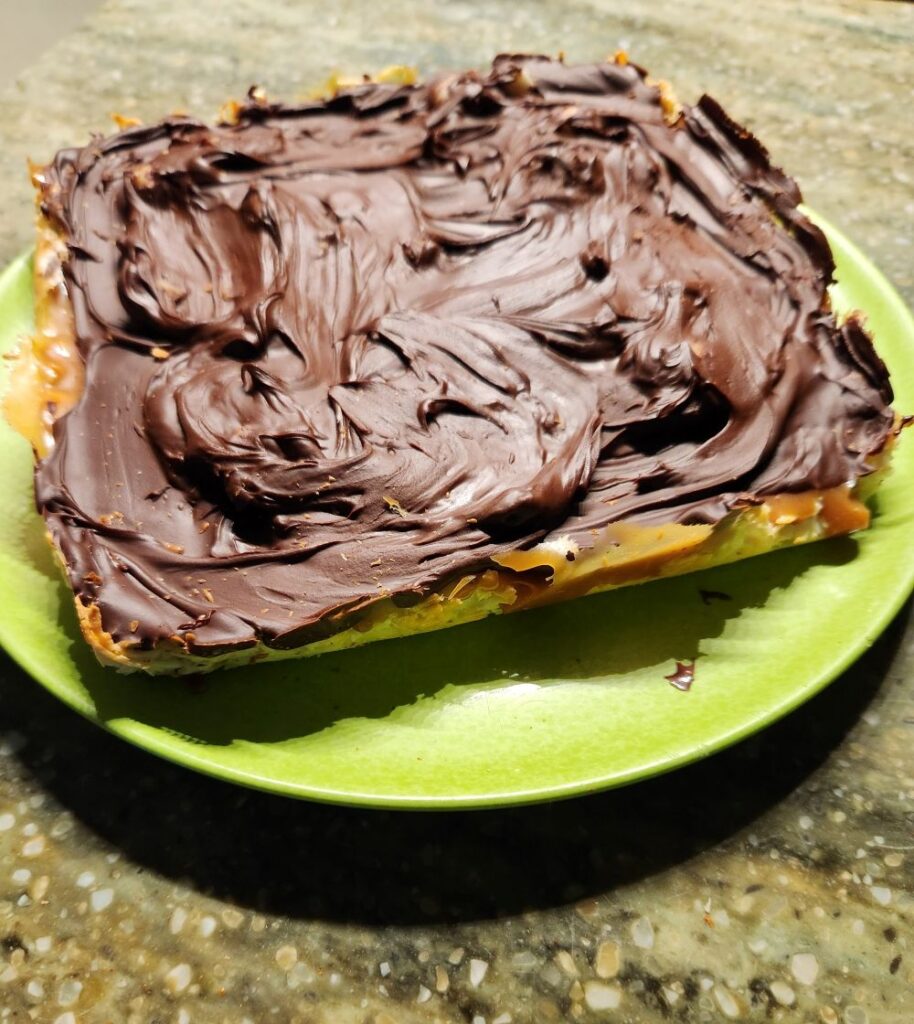
The coconut, caramel and chocolate base ready for cutting

Directions

1. Preheat oven to 325° F and line an 8 X 8-inch pan with parchment paper
2. In a bowl, mix shredded coconut, sweetened condensed milk, vanilla extract and
egg white until evenly combined
3. Press the coconut mixture firmly into pan and bake 18-22 minutes until slightly
golden around the edges and slightly toasted. Let cool.
4. Melt Caramels with heavy cream until smooth and thick. Then spread the caramel
over the cooled coconut base.
5. Chill for 20-30 minutes so the caramel firms up slightly
6. Melt chocolate chips with coconut oil or butter until smooth and glossy. Spread
chocolate over the caramel layer
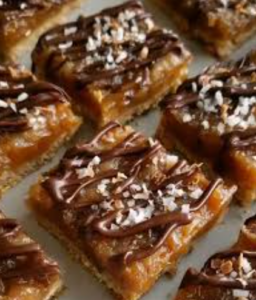
7. Drizzle a little extra chocolate over the top for a bakery style finish.
8. Chill until fully set, then cut into small squares or bites.

Calories per square- 150

Variation

Add Almond halves or sliced almonds and drizzel with chocolate for a more Almond Joy Vibe. Just as yummy but with a crunch


🎁 A Sweet Little Mother’s Day Gift

If you want to turn these into a Mother’s Day gift, a cute little box makes all the difference. I found this floral “Mom Ever” box at Gift Lab — it’s the only decorative box they have right now, but it’s adorable and just the right size for a handful of these chocolate‑caramel coconut bites.

Gift Lab also has lots of other Mother’s Day‑friendly items: personalized gifts, photo keepsakes, and sweet little things that pair beautifully with a homemade treat. I’ll link the box and a few favorites below.

Shop GiftLab


Even one small box filled with these pop‑in‑your‑mouth bites is enough to make Mom smile.

If chocolate, caramel, and coconut don’t say “I love you,” I don’t know what does.

*****************************************************************************************************************

Note:
I discovered that if you don’t cut the squares right away (I didn’t), the chocolate gets pretty firm and makes next‑day slicing a bit of a challenge. That got me thinking: why not skip the pan altogether next time?
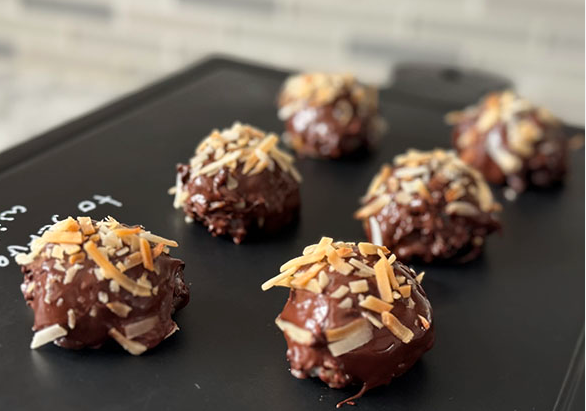
Try this variation:
Use a small scoop to portion the coconut mixture into little mounds, Place on a cookie sheet covered with parchment paper. Press a small indentation in the center, and bake as usual. Once cooled, spoon caramel into the indentation, press an almond on top, and dip the whole thing in melted chocolate. Same flavors, same layers — just in cute individual “Mounds” style bites. Basically a homemade Almond Joy.

I’m going to try this version next time. If any of you beat me to it, let me know how they turn out.


No-Bake Chocolate Peanut Butter Bars

One More Recipe… I Couldn’t Resist

I know, I know — I said I was going to take a little break from cooking posts. Around Dusty Roads is more than a recipe corner, after all. But when something this easy and this delicious crosses my path, how am I supposed to keep it to myself?

So here we are. One more. I promise it’s worth it.

Do you love peanut butter? Do you have a sweet tooth that wakes up the moment you see those peanut butter eggs at Easter or the Christmas tree–shaped Reese’s? If you’re nodding along, this one’s for you. It’s rich, it’s nostalgic, it’s no-bake, and it’s dangerously simple.

While I was digging through Turtle Fudge recipes for Valentine’s Day, I stumbled across this gem: No-Bake Chocolate Peanut Butter Bars. The only real “work” involved is giving your biceps a little workout while mixing — so grab your trusty wooden spoon and channel your inner “Get Ready to Rumble!”


No-Bake Chocolate Peanut Butter Bars

Ingredients

  • ½ cup (8 Tbsp.) salted butter, melted
  • 1 cup graham cracker crumbs (about 8 full sheets)
  • 2 cups confectioners’ sugar
  • 1 cup + 2 tablespoons creamy peanut butter, divided
  • 1 cup semi-sweet chocolate chips

Peanut butter mix should look like this

Instructions

  1. Line an 8- or 9-inch square baking pan with aluminum foil or parchment paper; set aside.
  2. In a medium bowl, mix the melted butter, graham cracker crumbs, and confectioners’ sugar. Stir in 1 cup of peanut butter, then press the mixture evenly into the prepared pan.
  3. Melt the remaining 2 tablespoons of peanut butter with the chocolate chips — microwave or stovetop both work. Stir until smooth, then spread over the peanut butter layer.
  4. Chill in the refrigerator until completely firm, at least 2 hours. Let sit at room temperature for about 10 minutes before cutting.
  5. Store leftovers tightly covered in the fridge for up to a week.

almost as good as the pro’s

You can find the original recipe and extra notes over at Sally’s Baking.


No-bake, no guilt… unless you eat the whole pan. Not that I’d know.

If you give these a try, let me know how they turn out. I love hearing your tweaks, triumphs, and taste‑tester reviews.


A Holiday Tradition- The Cookie Exchange

Celebrating National Cookie Exchange Day: Sweet Treats & Sweeter Traditions

There’s something extra special about December 22nd—National Cookie Exchange Day. It’s the unofficial kickoff to that delightful moment when kitchens everywhere turn into flour‑dusted wonderlands, ovens hum like old friends, and neighbors appear at your door with tins full of sugary surprises. Around Dusty Roads, we’re all about celebrating the small joys that make a season feel special, and a cookie exchange is one of those traditions that warms the heart as much as the home.

Why Cookie Exchanges Are Pure Holiday Joy

Cookie exchanges aren’t just about the treats—though let’s be honest, that’s a pretty big perk. They’re about community, creativity, and the simple pleasure of sharing something homemade. Whether you’re a seasoned baker with a signature cookie or someone who relies on the “add water and stir” method (no judgment here), there’s room for everyone at the cookie table.

Plus, you walk away with a variety of cookies without having to bake a dozen different recipes. Efficiency and sugar? A winning combination.

Mom’s Recipe Corner: A Cookie Worth Exchanging

Of course, no cookie exchange is complete without a recipe that earns a few “Who made these?” whispers. So we’re dipping into Mom’s Recipe Corner for a tried‑and‑true classic: Chocolate Peppermint Pinwheel Cookies—a soft, spiced, crowd‑pleasing cookie that looks festive without requiring a culinary degree.

This cookie is a version of the classic Chocolate and Vanilla Icebox cookie. It was a staple of my youth. I admit it took more than a few tries to get the peppermint right. If the candy isn’t crushed enough your cookies are going to spread in the oven. But they still will taste good.

I found this recipe fun to play with. Sometimes I’d use white chocolate and 3 layers of dough so you got more swirls.

Let your imagination rule the day! Then , of course, share the bounty.

Share the Sweetness

Whether you’re hosting a cookie exchange, joining one, or simply gifting a plate to a neighbor, today is all about spreading joy one bite at a time. So preheat that oven, put on your coziest playlist, and let the holiday spirit rise—just like your cookies.


If you want more recipes for your exchange, Mom’s Recipe Corner is always cooking up something delicious.

Chocolate Cupcake Day


🌿 Sweet Traditions in Small Cups

There’s something magical about a dessert that fits in the palm of your hand. Cupcakes—those tiny, frosted wonders—have long been a symbol of celebration, comfort, and creativity. Whether they’re dressed in swirls of buttercream or filled with gooey surprises, each one feels like a personal treat made just for you.

As the leaves turn and the air grows crisp here in Taunton, I find myself drawn to cozy kitchen rituals and nostalgic flavors. National Chocolate Cupcake Day is the perfect excuse to indulge in a little baking joy—and maybe even discover a new favorite twist on this timeless treat.

In this post, we’ll explore the cupcake’s curious history, dive into decadent chocolate pairings, and share fun ways to celebrate. I’ll also include one of my go-to recipes and a few baking tools I love (affiliate links included). Let’s get mixing…

🧁 Cupcakes: Small Wonders with a Storied Past

Before they were the stars of birthday parties and bakery windows, cupcakes had a humble beginning. Back in 1796, Amelia Simmons scribbled down a recipe for “a cake to be baked in small cups” in her cookbook American Cookery. It wasn’t until 1828 that Eliza Leslie gave these dainty treats their now-famous name: “cupcake.”

In those early days, bakers used pottery cups and ramekins—long before muffin tins became kitchen staples. Over time, these sweet bites picked up whimsical nicknames like “Fairy Cakes” and “Patty Cakes,” adding a sprinkle of charm to their legacy.


🍫 Chocolate Cupcakes with a Twist

Classic chocolate cupcakes are always a crowd-pleaser, but why not let your taste buds wander? Here are some flavor-forward combinations that turn tradition on its head:

  • Devil’s Food + Ganache: Deep, velvety chocolate meets glossy ganache in a decadent duo.
  • Chocolate + Peanut Butter: A nostalgic pairing, elevated with sea salt and silky frosting.
  • Chocolate + Mint: Cool, crisp buttercream adds a refreshing contrast to rich cocoa.
  • Chocolate + Caramel: Think molten center, topped with a caramel swirl that melts on the tongue.
  • Chocolate + Orange Zest: Bright citrus notes in a tangy cream cheese frosting bring elegance to every bite.
  • Chocolate + Cinnamon or Chili: A whisper of spice adds warmth and intrigue—unexpected, unforgettable.

🎉 How to Celebrate Chocolate Cupcake Day in Style

Whether you’re baking solo or gathering with friends, here are five fun ways to mark the occasion:

  1. DIY Cupcake Bar: Bake a batch and set up a decorating station with frostings, sprinkles, nuts, and candies.
  2. Bakery Crawl: Treat yourself to a chocolate cupcake from your favorite local spot—or discover a new one!
  3. Recipe Adventure: Try a bold new chocolate cupcake recipe and share your results with friends or followers.
  4. Cupcake Swap: Host a sweet exchange where everyone brings a dozen homemade cupcakes and leaves with a sampler box.
  5. Snap + Share: Post your cupcake creations on social media using #ChocolateCupcakeDay and spread the joy.


🍽 Featured Recipe: Classic Chocolate Cupcakes

Let’s bring the celebration into your kitchen with a tried-and-true chocolate cupcake recipe that’s rich, moist, and ready for any topping adventure.

Ingredients:

  • 1 cup all-purpose flour
  • ½ cup unsweetened cocoa powder
  • ¾ tsp baking powder
  • ½ tsp baking soda
  • ¼ tsp salt
  • 2 large eggs
  • ½ cup granulated sugar
  • ½ cup brown sugar
  • ⅓ cup vegetable oil
  • ½ cup buttermilk
  • 1 tsp vanilla extract

Instructions:

  1. Preheat your oven to 350°F (175°C) and line a muffin tin with cupcake liners.
  2. In a bowl, whisk together flour, cocoa powder, baking powder, baking soda, and salt.
  3. In a separate bowl, beat the eggs, sugars, oil, buttermilk, and vanilla until smooth.
  4. Gradually add the dry ingredients to the wet mixture, stirring until just combined.
  5. Divide the batter evenly among the liners and bake for 18–20 minutes, or until a toothpick comes out clean.
  6. Let cool completely before frosting with your favorite topping—ganache, buttercream, or something wild!


🛒 Baking Essentials Spotlight

If you’re ready to whip up a batch, here are a few muffin tins I recommend—durable, easy to clean, and perfect for cupcake magic:

These affiliate links help support Around Dusty Roads at no extra cost to you. I only share products I genuinely love or use myself—especially when they make baking (and cleanup) a breeze.


Cactus and Chocolate

I hope everyone had a nice Easter. It turned out to be a beautiful spring day in Taunton.

I want to back track a little on the Vegas adventure. I missed a part of the tour when we went to Hoover Dam.

The “Dam”Tour was great but there was one more stop before we went back to the hotel and that was at the Botanical Cactus gardens and the Ethel M. Chocolate Factory.

DSC_2454 copy

When the bus first pulled up I only wanted to see the gardens. Dropping into the Chocolate factory could wait. I don’t need more candy. My time share has been showering us with boxes of Ghirardelli Squares since we checked in.

So into the prickly garden I went.

DSC_2452 copy

They had all sorts of cactus.  Rabbit Ears

DSC_2450 copy

Saguaro

DSC_2449 copy

Prickly Pear

But soon it was time to stick my nose into the chocolate factory.  Inspired by Ethel Mars‘ pursuit of the perfect chocolate, Forrest Mars Sr. created Ethel M, named in his mother’s honor. Using her timeless recipes. It’s not all about M &M’s.

DSC_2453 copy

My favorite turned out to be the pecan bark. Since the chocolate is made without preservatives in small batches it meant that I’d have to eat this chocolate in a hurry. But it was sooo Yummy!