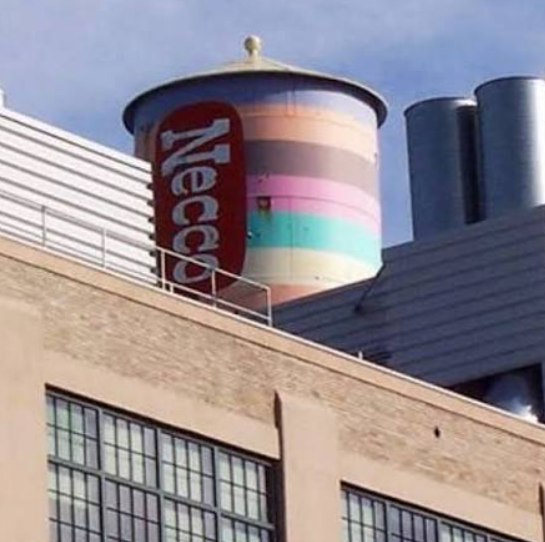
If you grew up in New England, Necco wasn’t just a candy brand — it was part of the scenery. The pastel wafers, the Valentine hearts, the Cambridge factory with its neon sign glowing over Mass Ave… it all felt woven into everyday life. Necco was one of those regional icons you didn’t think much about until suddenly, it was gone.
Necco Wafers: America’s First “Melt in Your Mouth, Not in Your Hand” Candy… Before M&M’s
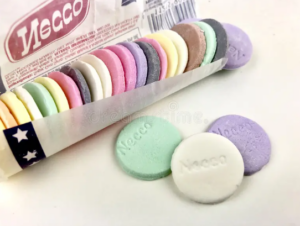 Necco Wafers weren’t just old — they were historic. Dating back to the 1840s, they were one of America’s earliest mass‑produced candies. Soldiers carried them in the Civil War. Explorers packed them for long expeditions. They lasted forever, held up in heat, and didn’t crumble in a pocket.
And here’s the fun part: Long before M&M’s turned “melts in your mouth, not in your hand” into a marketing empire, Necco Wafers were already doing it. They didn’t have a sugar shell — they were simple, chalky discs — but they were famously durable. They survived heat, humidity, backpacks, pockets, and battlefields without turning into a sticky mess. The original tough‑as‑nails candy.
Sweethearts: The Chalky Little Hearts That Defined Valentine’s Day
Then there were the conversation hearts — Sweethearts. Every February, those pastel hearts took over classrooms, office desks, and candy bowls. “Be Mine.” “Cutie Pie.” “Call Me.” Corny, chalky, and absolutely iconic.
Necco made billions of them every year. When the company collapsed, Valentine’s Day actually felt wrong without them. Stores had empty shelves. People hoarded old bags. It was a tiny cultural crisis.
The Collapse: When a New England Institution Went Dark
In 2018, after nearly two centuries, Necco abruptly shut down. Workers were locked out. The Cambridge factory closed. The neon sign went dark. Candy lovers panicked, and New England collectively realized how much this quirky little company meant to its identity.
Necco Wafers disappeared. Sweethearts vanished. Sky Bar went extinct. It felt like losing a piece of home.
The Rescue: Necco Lives On
But New England doesn’t let its traditions die quietly.
Spangler Candy Company stepped in and revived Necco Wafers in 2020, keeping the classic flavors intact. Sweethearts returned too — a little imperfect at first, but unmistakably back. The original company is gone, but the candies themselves survived. The spirit of Necco lives on.
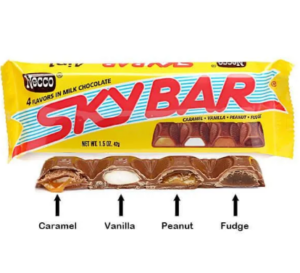
Sky Bar: The Rebel That Went Its Own Way
 Sky Bar didn’t follow the others.
Instead of being scooped up by a big candy company, it was rescued by a tiny gourmet shop in Sudbury, Massachusetts. Duck Soup bought the rights at auction, rebuilt the production process from scratch, and brought Sky Bar back as a small‑batch regional candy.
Eventually, Sky Bar spun off into its own brand — Sky Bar Candy — with its own website, its own store, and even its own merch. T‑shirts, hoodies, hats… all in that bright yellow retro logo. It’s the most New England thing imaginable: a beloved candy bar saved by sheer local determination.

In the End, It’s All New England
Necco’s story — collapse, rescue, reinvention — feels like a perfect metaphor for New England itself. Old traditions, stubborn loyalty, small businesses stepping up when the giants fall. Whether it’s wafers, Sweethearts, or the resurrected Sky Bar, these candies are stitched into the fabric of the region.
The factory may be gone, but the candy lives on. Still loved. Still nostalgic and unmistakably New England.


 When a Name Makes You Pause


 A Little Nostalgia


 Directions