Need a Last Minute Gift Idea?

Heads up, kitchen explorers!
This post contains affiliate links, which means I may earn a small commission if you click and buy—at no extra cost to you. I only recommend tools and treasures I truly love and think you will too. Thanks for helping keep the oven warm and the creativity flowing at Around Dusty Roads and Welcoming Haven!

Why Kitchen Tools Make Great Gifts

How many times have you heard someone say, “Oh, I don’t cook”? Every gathering turns into pizza delivery or Chinese takeout. These non-cooks have never experienced the joy of serving a home-cooked meal and watching friends and family dig in with delight.

🔪 From Intimidation to Inspiration

When you’re just starting out, the kitchen can feel like a foreign land—filled with mysterious gadgets and intimidating expectations. At first, it may seem overwhelming. However, with just a few essential tools, that sense of dread can begin to fade. Before long, cooking transforms from a chore into a creative, rewarding ritual—one that brings joy, confidence, and delicious results

🧰 Essential Tools for a Welcoming Kitchen

I’m a firm believer in having the right tool for the right job. Sure, I improvise now and then—but let’s start with the basics and see if we can outfit your kitchen to become a true Welcoming Haven.


🧰 Your Starter Kitchen Toolkit

Here are my must-have essentials for any budding home cook:

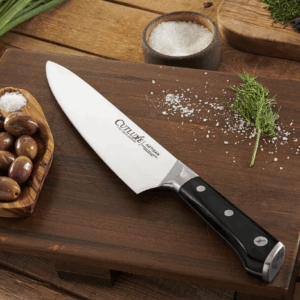
  • Chef’s Knife – The MVP of the kitchen. A broad, sharp blade makes chopping, slicing, mincing, and dicing a dream. Invest in one good knife and you’ll feel like a pro. Shop here
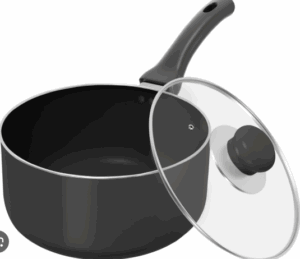
  • Saucepan (3–4 Quart) – Look for a heavy-bottomed pan with a secure handle and tight-fitting lid. Nonstick options make cleanup a breeze. Shop here
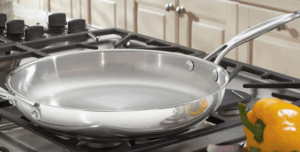
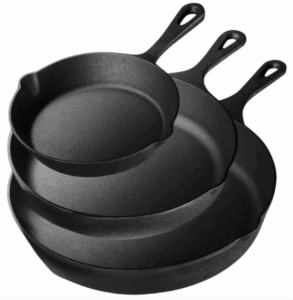
  • Skillet – A good skillet conducts heat evenly and lasts for years. Stainless steel, cast iron, or lined copper are excellent choices. Nonstick is great for beginners. Shop here
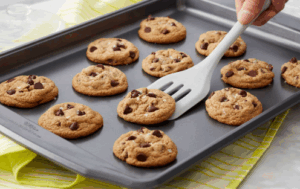
  • Baking Sheet – Choose a sturdy, rimmed sheet made of heavy-gauge aluminum or steel. Skip nonstick here—those coatings wear out and can affect your results. Shop Here
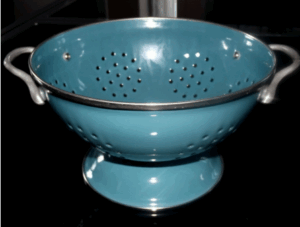
  • Colander – Essential for draining pasta or rinsing produce. Simple, but indispensable. Shop here
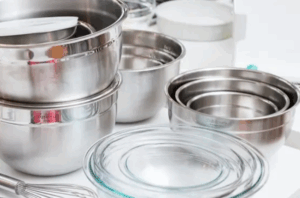
  • Mixing Bowls – You can’t whip up a cake without something to mix it in! Stainless steel is durable and versatile, glass is microwave-safe, and plastic is lightweight (but can stain over time). Shop Here
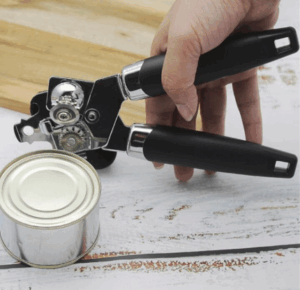
  • Can Opener – Electric models are convenient, but a manual opener (like the OXO Good Grips) is a must-have—especially during power outages. Shop Here
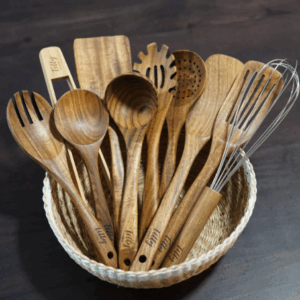
  • Wooden Spoon & Silicone Spatula – Wooden spoons are gentle on cookware and stay cool to the touch. A silicone spatula is perfect for mixing, scraping, and folding. Shop Here
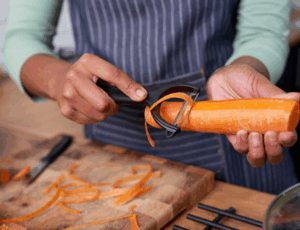
  • Peeler – More efficient (and safer) than a paring knife for many tasks. Great for potatoes, carrots, apples—you name it. Shop Here
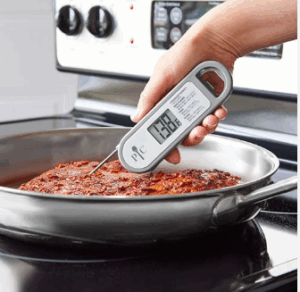
  • Digital Kitchen Thermometer – Crucial for food safety. Don’t guess—know when your meat, poultry, or eggs are cooked to safe temperatures. Shop Here
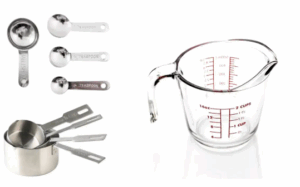
  • Measuring Cups & Spoons – Precision matters. These tools help you follow recipes accurately and recreate your favorite dishes every time. Shop Here
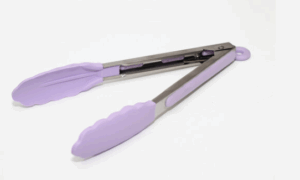
  • Tongs – Protect your hands while flipping, lifting, or serving hot food. Once you have them, you’ll wonder how you cooked without them. Shop Here
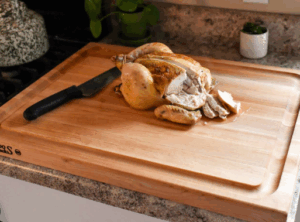
  • Cutting Boards – Protect your counters and prevent cross-contamination. Use separate boards for meat, veggies, and bread for extra safety. Shop Here

🍳 Start Simple, Cook Confidently

These are my go-to essentials for anyone starting their culinary journey. Of course, there are plenty more tools you can add over time—but this kit will give you a solid foundation.

I didn’t include storage containers because most folks already have something for leftovers. But if you’re gifting, a set of glass containers or beeswax wraps makes a lovely add-on.

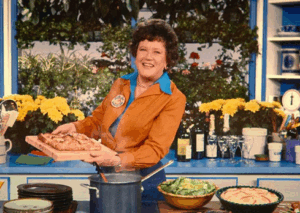
As Julia Child would say—Bon appétit!


Oh That Cast Iron Skillet


🍳 Cast Iron Adventures & a Rule-Breaking Apple Pie

We’ve been busy in the kitchen lately—Skillet Meatloaf (a personal favorite), Apple Pancakes, and even a quick Skillet Lasagna. But let me be clear: tomato sauce and cast iron skillets don’t mix. The acidity can damage the seasoning. Still, it’s a great weeknight lasagna recipe—just use a different pan.

Apple Pancake


But today, we’re talking cast iron. And pie. Specifically, a skillet apple pie that made me break all my pie rules.


🥧 My Pie Rules

Before we dive in, here’s what you need to know about me:

  • I love apple pie. The only pie I love more is strawberry rhubarb.
  • My mom was a champion pie baker. We always had pie, especially around the holidays.
  • My dad and I once ate an entire apple pie by ourselves—just one more little slice at a time. It’s a family legend.
  • I don’t bake pies anymore. It’s just me, and I don’t need all those sweet calories.
  • When (if) I do bake pies, I NEVER use refrigerated pie dough. I ALWAYS make it from scratch.

So now that you know the basics… I’m about to break every single one of those rules.


🍏 Easy Skillet Apple Pie

This recipe popped up in my feed from the Southern Living Test Kitchen. I set it aside, but like a magnet to iron, I kept coming back. Eventually, I gave in and headed to the grocery store.

Granny Smith apples? No problem. Braeburn? Never heard of them. They didn’t have any, but they did have Honeycrisp and my old standby, McIntosh. According to Google, there are seven good substitutes for Braeburn. I went with the familiar—McIntosh.

Then came the refrigerated pie dough. Cue dramatic pause. I’m not a fan. I prefer flaky, tender crusts made with lard or Crisco. But I promised myself I’d follow the recipe. So… refrigerated pie dough it is.


📝 The Recipe

Ingredients:

  • 2 lbs. Granny Smith apples
  • 2 lbs. Braeburn apples (I used McIntosh)
  • 1 tsp ground cinnamon
  • ¾ cup granulated sugar
  • ½ cup butter
  • 1 cup firmly packed brown sugar
  • 1 (14 oz) package refrigerated pie crust (2 crusts)
  • 1 egg white
  • 2 Tbsp granulated sugar
  • Ice cream or sharp cheddar cheese (optional)

Directions:

Step 1: Prepare the Apples
Preheat oven to 350°F. Peel apples and cut into ½-inch wedges. Toss with cinnamon and ¾ cup granulated sugar. Set aside.

Step 2: Prepare the Crust
Melt butter in a 10-inch cast iron skillet over medium heat. Add brown sugar and stir constantly for 1–2 minutes until dissolved.
Remove from heat and place one pie crust over the brown sugar mixture.

Step 3: Add the Filling
Spoon apple mixture evenly over the crust.

Step 4: Add the Top Crust
Top with the second pie crust. Whisk egg white until foamy and brush over the top. Sprinkle with 2 Tbsp granulated sugar.
Cut 4–5 slits in the top to allow steam to escape.

Step 5: Bake
Bake at 350°F for 1 hour to 1 hour 10 minutes, or until golden brown and bubbly.
Shield with foil during the last 10 minutes if needed to prevent over-browning.
Cool on a wire rack for 30 minutes before serving.

Serve with ice cream or a slice of sharp cheddar cheese.


🧼 Notes & Tips

  • Use a drip pan or line the bottom of your oven with foil—this pie bubbles over, and cleanup without protection is no fun.
  • Surprisingly, the tougher refrigerated crust holds up well against the gooey filling.

Now I’m stuck with a delicious 10-inch apple pie. Guess I’ll just have to take one for the team. I’m going to enjoy every bite—and I hope you do too.


🍂 Welcoming Haven Picks (Affiliate Links)

If you’re inspired to try this recipe, here are a few cozy kitchen picks from Welcoming Haven that fit right in:

As an affiliate, I may earn a small commission if you make a purchase through these links—thank you for supporting Around Dusty Roads and Welcoming Haven!


National Mincemeat Day


🥧 Wait… There’s a National Mincemeat Day?

Who knew National Mincemeat Day was a thing? I certainly didn’t. Honestly, I wasn’t even sure what mincemeat was. Is it meat? Is it fruit? Is it some kind of culinary prank? I vaguely remember my mother making mincemeat pies around the holidays, but I never tried one. (Sorry, Mom.)

Stock photo

🤔 So What Is Mincemeat?

A quick Google search cleared up some of the mystery. Turns out, the original mincemeat recipe dates back over 500 years and was a hearty mix of diced fruit, meat, and distilled alcohol—because apparently, nothing says “festive” like boozy meat-fruit pie. It was used as a pie filling and featured spices like nutmeg and cinnamon, which are more fruitcake than steakhouse. Speaking of fruitcake… I’m not a fan. So maybe that explains my lifelong avoidance of mincemeat.

🕰️ From Preservation to Pie

Back in the day, bakers preserved meat with fruits and spices. Then, sometime around the 5th century, someone had the brilliant idea to toss it all into a pie. Voilà—mincemeat pies were born. Fast forward to the 19th century, and the meat started to disappear, replaced by raisins, apples, and candied lemon peel. By the 20th century, even meatless versions were still called mincemeat. Because why not confuse everyone?

🧪 A Quick Mincemeat Recipe (That I Will Never Make)

Once again, Google came through with a recipe. Full disclosure: I’ve never made mincemeat, and I don’t plan to. But if you’re feeling adventurous—or just want to impress your great-aunt Mildred—here’s a simple version to try. Or skip the kitchen and grab a jar from the store. If you do try it, let me know how it goes. I’ll be cheering you on from a safe, mincemeat-free distance.

Ingredients:

  • 2/3 cup (90g) coarsely chopped raisins (dark or golden)
  • 1/2 cup (60g) chopped candied orange peel
  • 1/4 cup (60ml) brandy, plus more if needed (for the mincemeat, not your nerves)
  • Grated zest of one orange (preferably unsprayed)
  • 1 teaspoon freshly squeezed lemon juice
  • 2 tablespoons light or dark brown sugar
  • 1/2 teaspoon each of ground cinnamon and nutmeg
  • 1/4 teaspoon ground cloves

Directions:

  1. Mix everything together in a bowl, then pack into a jar. Cover.
  2. Let it sit for 1–3 days before using. If it looks dry after day one, add a splash more brandy.
  3. Add to an apple or pear-based fruit filling for a pie or crisp before baking.

🎉 Final Thoughts from a Mincemeat Skeptic

So there you have it—National Mincemeat Day in all its quirky, fruity, slightly boozy glory. Whether you’re a die-hard fan or a curious bystander like me, it’s a fun excuse to explore a centuries-old tradition. Just don’t ask me to taste it. I’ll be over here with my apple pie, living my best life.

Yummy Apple Pie


To Brew or not to Brew – Coffee that is


☕️ Coffee in Chocolate Cake: Bold Move or Bitter Mistake?

There’s a quiet magic that happens when coffee meets chocolate. It’s not about turning your cake into a mocha—it’s about deepening the flavor, adding richness, and coaxing out the darker, more complex notes in cocoa. But like any bold baking choice, it comes with its own set of perks and pitfalls.

If you’ve ever wondered whether to splash a bit of brewed coffee into your batter or stick with the classic approach, here’s a breakdown to help you decide.

✅ The Perks of Adding Coffee

  • Flavor Amplification: Coffee acts like a backstage crew for chocolate—enhancing its richness without stealing the spotlight. Even a small amount can make your cake taste more “chocolatey.”
  • Moisture Boost: Brewed coffee adds liquid and depth, often resulting in a more tender crumb.
  • Bitterness Balance: A touch of coffee can mellow out overly sweet frostings or fillings, creating a more balanced bite.
  • Aromatic Appeal: The scent of coffee mingling with cocoa in the oven? Pure sensory poetry.

⚠️ The Potential Pitfalls

  • Flavor Overload: Too much coffee can overpower the chocolate, especially if you’re using strong espresso or dark roast.
  • Audience Sensitivity: Not everyone loves coffee—or can tolerate caffeine. If you’re baking for kids or sensitive eaters, it’s worth considering.
  • Ingredient Clash: Coffee pairs beautifully with chocolate, but it might clash with other flavors like citrus, certain fruits, or delicate floral notes.

🌿 My Take: Use It Like a Spice

Think of coffee as a seasoning—just enough to enhance, never dominate. A tablespoon or two of brewed coffee or a teaspoon of instant espresso powder can elevate your chocolate cake without turning it into a latte.

Whether you’re baking for a cozy fall gathering in Taunton or just treating yourself to a quiet moment with Banner and Balboa curled nearby, coffee can be your secret weapon for depth and drama in dessert.

Chocolate Cake recipe ( allrecipes)

Ingredients

  • 2 cups all-purpose flour
  • 2 cups white sugar
  • ¾ cup unsweetened cocoa powder
  • 2 teaspoons baking soda
  • 1 teaspoon baking powder
  • ½ cup vegetable oil
  • 1 cup milk
  • 2 eggs
  • 1 teaspoon vanilla extract
  • 1 cup hot, strong coffee

Directions

  1. Preheat the oven to 350 degrees F (175 degrees C). Grease and flour a 9×13-inch baking pan.

  2. In a large bowl, stir together flour, sugar, cocoa, baking powder, and baking soda. Add oil, milk, eggs, and vanilla; mix until smooth. Stir in hot coffee last. Spread evenly into the prepared pan.

  3. Bake in the preheated oven for 25 to 35 minutes, or until a toothpick inserted into the cake comes out clean.


🛒 Baking Essentials Spotlight

If you’re ready to start baking here are a few baking pans for your cake that I highly recommend—durable, easy to clean, and perfect for your culinary masterpiece

These affiliate links help support Around Dusty Roads at no extra cost to you. I only share products I genuinely love or use myself—especially when they make baking (and cleanup) a breeze.

Chocolate Cupcake Day


🌿 Sweet Traditions in Small Cups

There’s something magical about a dessert that fits in the palm of your hand. Cupcakes—those tiny, frosted wonders—have long been a symbol of celebration, comfort, and creativity. Whether they’re dressed in swirls of buttercream or filled with gooey surprises, each one feels like a personal treat made just for you.

As the leaves turn and the air grows crisp here in Taunton, I find myself drawn to cozy kitchen rituals and nostalgic flavors. National Chocolate Cupcake Day is the perfect excuse to indulge in a little baking joy—and maybe even discover a new favorite twist on this timeless treat.

In this post, we’ll explore the cupcake’s curious history, dive into decadent chocolate pairings, and share fun ways to celebrate. I’ll also include one of my go-to recipes and a few baking tools I love (affiliate links included). Let’s get mixing…

🧁 Cupcakes: Small Wonders with a Storied Past

Before they were the stars of birthday parties and bakery windows, cupcakes had a humble beginning. Back in 1796, Amelia Simmons scribbled down a recipe for “a cake to be baked in small cups” in her cookbook American Cookery. It wasn’t until 1828 that Eliza Leslie gave these dainty treats their now-famous name: “cupcake.”

In those early days, bakers used pottery cups and ramekins—long before muffin tins became kitchen staples. Over time, these sweet bites picked up whimsical nicknames like “Fairy Cakes” and “Patty Cakes,” adding a sprinkle of charm to their legacy.


🍫 Chocolate Cupcakes with a Twist

Classic chocolate cupcakes are always a crowd-pleaser, but why not let your taste buds wander? Here are some flavor-forward combinations that turn tradition on its head:

  • Devil’s Food + Ganache: Deep, velvety chocolate meets glossy ganache in a decadent duo.
  • Chocolate + Peanut Butter: A nostalgic pairing, elevated with sea salt and silky frosting.
  • Chocolate + Mint: Cool, crisp buttercream adds a refreshing contrast to rich cocoa.
  • Chocolate + Caramel: Think molten center, topped with a caramel swirl that melts on the tongue.
  • Chocolate + Orange Zest: Bright citrus notes in a tangy cream cheese frosting bring elegance to every bite.
  • Chocolate + Cinnamon or Chili: A whisper of spice adds warmth and intrigue—unexpected, unforgettable.

🎉 How to Celebrate Chocolate Cupcake Day in Style

Whether you’re baking solo or gathering with friends, here are five fun ways to mark the occasion:

  1. DIY Cupcake Bar: Bake a batch and set up a decorating station with frostings, sprinkles, nuts, and candies.
  2. Bakery Crawl: Treat yourself to a chocolate cupcake from your favorite local spot—or discover a new one!
  3. Recipe Adventure: Try a bold new chocolate cupcake recipe and share your results with friends or followers.
  4. Cupcake Swap: Host a sweet exchange where everyone brings a dozen homemade cupcakes and leaves with a sampler box.
  5. Snap + Share: Post your cupcake creations on social media using #ChocolateCupcakeDay and spread the joy.


🍽 Featured Recipe: Classic Chocolate Cupcakes

Let’s bring the celebration into your kitchen with a tried-and-true chocolate cupcake recipe that’s rich, moist, and ready for any topping adventure.

Ingredients:

  • 1 cup all-purpose flour
  • ½ cup unsweetened cocoa powder
  • ¾ tsp baking powder
  • ½ tsp baking soda
  • ¼ tsp salt
  • 2 large eggs
  • ½ cup granulated sugar
  • ½ cup brown sugar
  • ⅓ cup vegetable oil
  • ½ cup buttermilk
  • 1 tsp vanilla extract

Instructions:

  1. Preheat your oven to 350°F (175°C) and line a muffin tin with cupcake liners.
  2. In a bowl, whisk together flour, cocoa powder, baking powder, baking soda, and salt.
  3. In a separate bowl, beat the eggs, sugars, oil, buttermilk, and vanilla until smooth.
  4. Gradually add the dry ingredients to the wet mixture, stirring until just combined.
  5. Divide the batter evenly among the liners and bake for 18–20 minutes, or until a toothpick comes out clean.
  6. Let cool completely before frosting with your favorite topping—ganache, buttercream, or something wild!


🛒 Baking Essentials Spotlight

If you’re ready to whip up a batch, here are a few muffin tins I recommend—durable, easy to clean, and perfect for cupcake magic:

These affiliate links help support Around Dusty Roads at no extra cost to you. I only share products I genuinely love or use myself—especially when they make baking (and cleanup) a breeze.