National Mincemeat Day


🥧 Wait… There’s a National Mincemeat Day?

Who knew National Mincemeat Day was a thing? I certainly didn’t. Honestly, I wasn’t even sure what mincemeat was. Is it meat? Is it fruit? Is it some kind of culinary prank? I vaguely remember my mother making mincemeat pies around the holidays, but I never tried one. (Sorry, Mom.)

Stock photo

🤔 So What Is Mincemeat?

A quick Google search cleared up some of the mystery. Turns out, the original mincemeat recipe dates back over 500 years and was a hearty mix of diced fruit, meat, and distilled alcohol—because apparently, nothing says “festive” like boozy meat-fruit pie. It was used as a pie filling and featured spices like nutmeg and cinnamon, which are more fruitcake than steakhouse. Speaking of fruitcake… I’m not a fan. So maybe that explains my lifelong avoidance of mincemeat.

🕰️ From Preservation to Pie

Back in the day, bakers preserved meat with fruits and spices. Then, sometime around the 5th century, someone had the brilliant idea to toss it all into a pie. Voilà—mincemeat pies were born. Fast forward to the 19th century, and the meat started to disappear, replaced by raisins, apples, and candied lemon peel. By the 20th century, even meatless versions were still called mincemeat. Because why not confuse everyone?

🧪 A Quick Mincemeat Recipe (That I Will Never Make)

Once again, Google came through with a recipe. Full disclosure: I’ve never made mincemeat, and I don’t plan to. But if you’re feeling adventurous—or just want to impress your great-aunt Mildred—here’s a simple version to try. Or skip the kitchen and grab a jar from the store. If you do try it, let me know how it goes. I’ll be cheering you on from a safe, mincemeat-free distance.

Ingredients:

  • 2/3 cup (90g) coarsely chopped raisins (dark or golden)
  • 1/2 cup (60g) chopped candied orange peel
  • 1/4 cup (60ml) brandy, plus more if needed (for the mincemeat, not your nerves)
  • Grated zest of one orange (preferably unsprayed)
  • 1 teaspoon freshly squeezed lemon juice
  • 2 tablespoons light or dark brown sugar
  • 1/2 teaspoon each of ground cinnamon and nutmeg
  • 1/4 teaspoon ground cloves

Directions:

  1. Mix everything together in a bowl, then pack into a jar. Cover.
  2. Let it sit for 1–3 days before using. If it looks dry after day one, add a splash more brandy.
  3. Add to an apple or pear-based fruit filling for a pie or crisp before baking.

🎉 Final Thoughts from a Mincemeat Skeptic

So there you have it—National Mincemeat Day in all its quirky, fruity, slightly boozy glory. Whether you’re a die-hard fan or a curious bystander like me, it’s a fun excuse to explore a centuries-old tradition. Just don’t ask me to taste it. I’ll be over here with my apple pie, living my best life.

Yummy Apple Pie


To Brew or not to Brew – Coffee that is


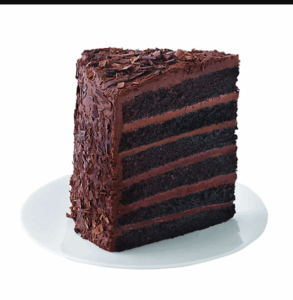
☕️ Coffee in Chocolate Cake: Bold Move or Bitter Mistake?

There’s a quiet magic that happens when coffee meets chocolate. It’s not about turning your cake into a mocha—it’s about deepening the flavor, adding richness, and coaxing out the darker, more complex notes in cocoa. But like any bold baking choice, it comes with its own set of perks and pitfalls.

If you’ve ever wondered whether to splash a bit of brewed coffee into your batter or stick with the classic approach, here’s a breakdown to help you decide.

✅ The Perks of Adding Coffee

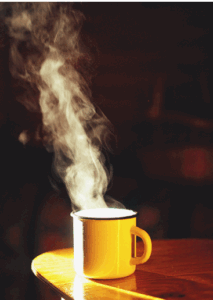
  • Flavor Amplification: Coffee acts like a backstage crew for chocolate—enhancing its richness without stealing the spotlight. Even a small amount can make your cake taste more “chocolatey.”
  • Moisture Boost: Brewed coffee adds liquid and depth, often resulting in a more tender crumb.
  • Bitterness Balance: A touch of coffee can mellow out overly sweet frostings or fillings, creating a more balanced bite.
  • Aromatic Appeal: The scent of coffee mingling with cocoa in the oven? Pure sensory poetry.

⚠️ The Potential Pitfalls

  • Flavor Overload: Too much coffee can overpower the chocolate, especially if you’re using strong espresso or dark roast.
  • Audience Sensitivity: Not everyone loves coffee—or can tolerate caffeine. If you’re baking for kids or sensitive eaters, it’s worth considering.
  • Ingredient Clash: Coffee pairs beautifully with chocolate, but it might clash with other flavors like citrus, certain fruits, or delicate floral notes.

🌿 My Take: Use It Like a Spice

Think of coffee as a seasoning—just enough to enhance, never dominate. A tablespoon or two of brewed coffee or a teaspoon of instant espresso powder can elevate your chocolate cake without turning it into a latte.

Whether you’re baking for a cozy fall gathering in Taunton or just treating yourself to a quiet moment with Banner and Balboa curled nearby, coffee can be your secret weapon for depth and drama in dessert.

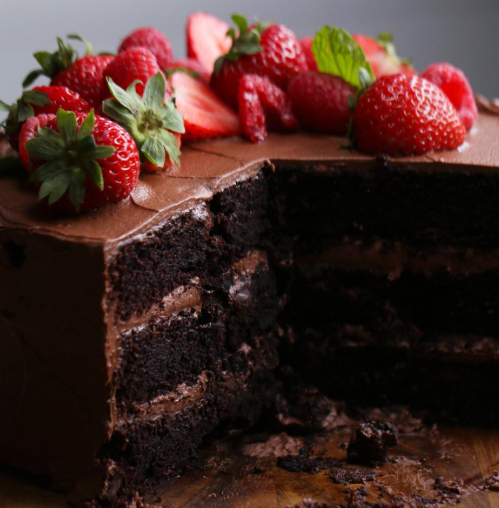
Chocolate Cake recipe ( allrecipes)

Ingredients

  • 2 cups all-purpose flour
  • 2 cups white sugar
  • ž cup unsweetened cocoa powder
  • 2 teaspoons baking soda
  • 1 teaspoon baking powder
  • ½ cup vegetable oil
  • 1 cup milk
  • 2 eggs
  • 1 teaspoon vanilla extract
  • 1 cup hot, strong coffee
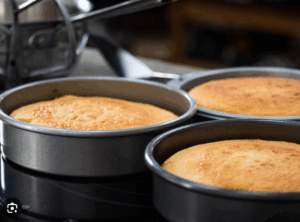
Directions

  1. Preheat the oven to 350 degrees F (175 degrees C). Grease and flour a 9×13-inch baking pan.

  2. In a large bowl, stir together flour, sugar, cocoa, baking powder, and baking soda. Add oil, milk, eggs, and vanilla; mix until smooth. Stir in hot coffee last. Spread evenly into the prepared pan.

  3. Bake in the preheated oven for 25 to 35 minutes, or until a toothpick inserted into the cake comes out clean.


🛒 Baking Essentials Spotlight

If you’re ready to start baking here are a few baking pans for your cake that I highly recommend—durable, easy to clean, and perfect for your culinary masterpiece

These affiliate links help support Around Dusty Roads at no extra cost to you. I only share products I genuinely love or use myself—especially when they make baking (and cleanup) a breeze.

Chocolate Cupcake Day


🌿 Sweet Traditions in Small Cups

There’s something magical about a dessert that fits in the palm of your hand. Cupcakes—those tiny, frosted wonders—have long been a symbol of celebration, comfort, and creativity. Whether they’re dressed in swirls of buttercream or filled with gooey surprises, each one feels like a personal treat made just for you.

As the leaves turn and the air grows crisp here in Taunton, I find myself drawn to cozy kitchen rituals and nostalgic flavors. National Chocolate Cupcake Day is the perfect excuse to indulge in a little baking joy—and maybe even discover a new favorite twist on this timeless treat.

In this post, we’ll explore the cupcake’s curious history, dive into decadent chocolate pairings, and share fun ways to celebrate. I’ll also include one of my go-to recipes and a few baking tools I love (affiliate links included). Let’s get mixing…

🧁 Cupcakes: Small Wonders with a Storied Past

Before they were the stars of birthday parties and bakery windows, cupcakes had a humble beginning. Back in 1796, Amelia Simmons scribbled down a recipe for “a cake to be baked in small cups” in her cookbook American Cookery. It wasn’t until 1828 that Eliza Leslie gave these dainty treats their now-famous name: “cupcake.”

In those early days, bakers used pottery cups and ramekins—long before muffin tins became kitchen staples. Over time, these sweet bites picked up whimsical nicknames like “Fairy Cakes” and “Patty Cakes,” adding a sprinkle of charm to their legacy.


🍫 Chocolate Cupcakes with a Twist

Classic chocolate cupcakes are always a crowd-pleaser, but why not let your taste buds wander? Here are some flavor-forward combinations that turn tradition on its head:

  • Devil’s Food + Ganache: Deep, velvety chocolate meets glossy ganache in a decadent duo.
  • Chocolate + Peanut Butter: A nostalgic pairing, elevated with sea salt and silky frosting.
  • Chocolate + Mint: Cool, crisp buttercream adds a refreshing contrast to rich cocoa.
  • Chocolate + Caramel: Think molten center, topped with a caramel swirl that melts on the tongue.
  • Chocolate + Orange Zest: Bright citrus notes in a tangy cream cheese frosting bring elegance to every bite.
  • Chocolate + Cinnamon or Chili: A whisper of spice adds warmth and intrigue—unexpected, unforgettable.

🎉 How to Celebrate Chocolate Cupcake Day in Style

Whether you’re baking solo or gathering with friends, here are five fun ways to mark the occasion:

  1. DIY Cupcake Bar: Bake a batch and set up a decorating station with frostings, sprinkles, nuts, and candies.
  2. Bakery Crawl: Treat yourself to a chocolate cupcake from your favorite local spot—or discover a new one!
  3. Recipe Adventure: Try a bold new chocolate cupcake recipe and share your results with friends or followers.
  4. Cupcake Swap: Host a sweet exchange where everyone brings a dozen homemade cupcakes and leaves with a sampler box.
  5. Snap + Share: Post your cupcake creations on social media using #ChocolateCupcakeDay and spread the joy.


🍽 Featured Recipe: Classic Chocolate Cupcakes

Let’s bring the celebration into your kitchen with a tried-and-true chocolate cupcake recipe that’s rich, moist, and ready for any topping adventure.

Ingredients:

  • 1 cup all-purpose flour
  • ½ cup unsweetened cocoa powder
  • ž tsp baking powder
  • ½ tsp baking soda
  • Âź tsp salt
  • 2 large eggs
  • ½ cup granulated sugar
  • ½ cup brown sugar
  • ⅓ cup vegetable oil
  • ½ cup buttermilk
  • 1 tsp vanilla extract

Instructions:

  1. Preheat your oven to 350°F (175°C) and line a muffin tin with cupcake liners.
  2. In a bowl, whisk together flour, cocoa powder, baking powder, baking soda, and salt.
  3. In a separate bowl, beat the eggs, sugars, oil, buttermilk, and vanilla until smooth.
  4. Gradually add the dry ingredients to the wet mixture, stirring until just combined.
  5. Divide the batter evenly among the liners and bake for 18–20 minutes, or until a toothpick comes out clean.
  6. Let cool completely before frosting with your favorite topping—ganache, buttercream, or something wild!


🛒 Baking Essentials Spotlight

If you’re ready to whip up a batch, here are a few muffin tins I recommend—durable, easy to clean, and perfect for cupcake magic:

These affiliate links help support Around Dusty Roads at no extra cost to you. I only share products I genuinely love or use myself—especially when they make baking (and cleanup) a breeze.


From Orchard to Basket: Fun Facts About Apples

Fun Facts About Apple Picking Season 🍎🌳

Crisp air, golden leaves, and the crunch of fresh apples—it must be apple picking season! Visiting an orchard is more than just a fall tradition; it’s an adventure full of history, flavor, and fun. Whether you’re filling a basket with Honeycrisp, Gala, or Granny Smith, here are some juicy facts to make your apple-picking trip even sweeter.

Apples: Nutrition and Health Benefits

Stock Photo

1. Apples are ancient travelers.
Did you know apples have been cultivated for thousands of years? They originated in Central Asia, near Kazakhstan, and slowly spread across the globe thanks to traders and explorers. Today, they’re grown in more than 100 countries.

2. There are thousands of varieties.
While you might only see a few dozen at the orchard or grocery store, there are over 7,500 different apple varieties worldwide. Each one has its own flavor, texture, and best use—some are perfect for pies, while others are best for snacking.

3. The U.S. loves apples.
Apples are the second most consumed fruit in the United States, right after bananas. Washington state leads the way in production, but orchards across the country bring local charm to the harvest.

4. They float for a reason.
Ever wonder why apple bobbing works? Apples are about 25% air, which makes them buoyant enough to float in water. It’s science and fun all in one!

5. Picking your own is fresher.
When you pick an apple straight from the tree, it can last weeks longer than store-bought ones, since they haven’t traveled through storage and shipping. Plus, nothing beats that first juicy bite in the orchard.

6. Apples symbolize health and wisdom.
You’ve heard the saying, “An apple a day keeps the doctor away.” While not a magic cure, apples are full of fiber, vitamin C, and antioxidants, making them a smart seasonal snack.

Growing Delicious Apples at Home: From Planting to Harvest

Stock Photo

So, grab a basket, head to your local orchard, and celebrate apple picking season with a little extra knowledge. After all, fall is the perfect time to make memories—and maybe even a pie!

My Perfect Apple Pie - RecipeTin Eats

Stock photo

Easy Apple Pie

Amazing apple pies start with amazing pie crusts. Here’s one tried and true pie crust recipe to get you started

All-Butter Pie Crust

Amy Duska

An easy, all-butter pie crust recipe that gives you a tender, flaky pie crust every time! This recipe makes 2 pie crusts
Prep Time 15minutes 
Chill Time 1hour 
Servings 2 (9″) pie crusts

Ingredients

Instructions

  • Prepare the water/vinegar mixture. Drop an ice-cube into a measuring cup and fill the measuring cup up with water to the ½ cup mark. Add 2 teaspoons of white vinegar and set aside.
  • Mix Flour and Butter. Combine the flour, salt, and sugar together in a medium sized bowl and toss with a fork to mix evenly. Add the cubed butter to the bowl and use a pastry cutter to cut the butter into the flour until the mixture forms large, coarse crumbs.
  • Add Water. Pour the water mixture, a few tablespoons at a time, into the flour/butter mixture and toss with a fork until the dough is evenly moist. Add water slowly to get the right texture.
  • Gather the dough. Use your hands to quickly bring the dough together in the bowl. Do not over work the dough.
  • Divide and Chill. Divide the dough in half and flatten into disks. Wrap the disks separately in plastic wrap and chill in the refrigerator for at least 1 hour.
  • Bake according to what your pie recipe calls for.
All American Apple Pie

Stock Photo

The Pie Recipe

Amy Duska

This is hands down the BEST and easiest apple pie recipe! It has a tender, flaky, homemade pie crust with apple slices drenched in sugar and warm spices like cinnamon and nutmeg.
Prep Time 1hour 
Cook Time 1hour 
Servings 8

Ingredients

Instructions

    • Start by preparing this flaky pie crust recipe which makes 2 (9″) pie crusts, one for the bottom and one for the top of the pie. The pie dough will need to chill for at least 1 hour before rolling out. Or use a store-bought pie crust and follow package directions.
    • Place oven rack in the center position and Preheat the oven to 400°F (204°C).
    • In a large bowl, combine the sliced apples, granulated sugar, light brown sugar, flour, cinnamon, nutmeg, and lemon juice and lemon zest; toss to coat evenly.
  • Remove the pie crust dough from the fridge and let rest at room temperature for 5-10 minutes. On a lightly floured surface, roll one disc into a 12″ circle that is ⅛” thick. Carefully lay the crust into the bottom of a deep dish pie plate.
  • Spoon the apple filling over the bottom crust and discard juices at the bottom of the bowl. Roll out the second disc of pie crust until it is ⅛” thick and lay it over the apple filling.
  • Use a sharp knife to trim the dough along the outside edge of the pie plate. Lift the edges where the two pie crust meet, gently press to seal and fold them under. Rotate the pie plate and repeat this process until edges are neatly tucked under themselves. Cut 4 slits in the top of the dough to allow steam to vent. Place the pie on a baking sheet.
  • Brush the surface of the pie crust with the egg wash and sprinkle with sanding sugar. Cover the edges with a pie shield or a strip of foil to keep them from over browning during the first 25 minutes.
  • Bake at 400°F (204°C) for 25 minutes. Carefully remove the pie shield, turn the oven down to 375° and continue to bake for an additional 30-35 minutes or until the top is golden brown and the juices are bubbly. Cool at room temperature for at least 3 hours.


Old-Fashioned Apple Pie

Stock photo

Eat a Peach Day

🍑 Eat a Peach Day

Food is always a welcome topic—after all, who doesn’t love to eat? Right now, my local grocery store is bursting with golden displays of fresh peaches, practically glowing under the summer lights. So I thought: why not celebrate this sweet, sun-kissed fruit?

1,401 Supermarket Peaches Stock Photos - Free & Royalty-Free ...


😬 Peach Fuzz

Fresh peaches aren’t my favorite—not because they lack flavor (they’re absolutely delicious), but because of the fuzz. Yes, peach fuzz is real, and it makes my teeth squeak. Or at least, I think it does. I just can’t stand the texture. If I’m willing to peel them, I enjoy them just fine. I also like canned peaches, though they’re often swimming in heavy syrup, which isn’t ideal.

🌍 Peach Factoids

Peaches grow in many states, including California and Pennsylvania, but in the U.S., they’re most famously associated with the South. Georgia even features a peach on its license plate—because who hasn’t heard of the iconic Georgia Peach?

🍽️ Peaches in Cooking

Here are a few peachy recipes that bring out the best in this summer fruit:

  1. • Peach Crumble – A cozy blend of cinnamon and brown sugar adds warm, molasses-like depth.
  2.  Peach Margarita – Peach schnapps and puree layer the flavor while keeping the cocktail bold.
  3.  Ginger Peach Jam – Preserve summer in a jar. This jam lasts well into winter, offering spoonfuls of sunshine
  4.  Peach Dump Cake – Just three ingredients. Minimal effort, maximum flavor. Win/win.
  5. • Easy Peach Cobbler – Juicy, sweet, and kissed with a hint of ginger spice.

Fresh Southern Peach Cobbler

High angle, looking at a bowl full of southern peach cobbler.


There are countless Cobbler recipes out there; but I chose  Allrecipe’s Southern Peach Cobbler for that authentic Southern touch. . Let me know what you think!

Ingredients

Original recipe yields 4 servings

  • 8 fresh peaches – peeled, pitted and sliced into thin wedges
  • Ÿ cup white sugar
  • Ÿ cup brown sugar
  • Ÿ teaspoon ground cinnamon
  • ⅛ teaspoon ground nutmeg
  • 1 teaspoon fresh lemon juice
  • 2 teaspoons cornstarch
  • 1 cup all-purpose flour
  • Ÿ cup white sugar
  • Ÿ cup brown sugar
  • 1 teaspoon baking powder
  • ½ teaspoon salt
  • 6 tablespoons unsalted butter, chilled and cut into small pieces
  • Ÿ cup boiling water
  • 3 tablespoons white sugar
  • 1 teaspoon ground cinnamon

Directions

Step 1

      Gather all ingredients.

Step 2

      Preheat the oven to 425 degrees F (220 degrees C).

Step 3

Combine peaches, 1/4 cup white sugar, 1/4 cup brown sugar, 1/4 teaspoon cinnamon, nutmeg, lemon juice, and cornstarch in a large bowl; toss to coat evenly, and pour into a 2-quart baking dish. Bake in preheated oven for 10 minutes.

Step 4

Meanwhile, combine flour, 1/4 cup white sugar, 1/4 cup brown sugar, baking powder, and salt in a large bowl. Blend in butter with your fingertips or a pastry blender until mixture resembles coarse crumbs. Stir in water until just combined.

Step 5 

Remove peaches from oven, and drop spoonfuls of topping over them.

Step 6

Mix 3 tablespoons white sugar and 1 teaspoon cinnamon together in a small bowl; sprinkle over entire cobbler.

Step 7

Bake in the preheated oven until topping is golden, about 30 minutes.

Step 8

Let cool for 30 minutes then service with a scoop of Vanilla Ice Cream.

🍨 Final Thoughts

Whether you’re peeling peaches or sipping them in a margarita, there’s something undeniably summery about their golden glow and juicy sweetness. So go ahead—eat a peach today. Your taste buds will thank you.


3,000+ Free Peach & Nature Images - Pixabay