Power, speed, and endless recipes—meet your new kitchen hero


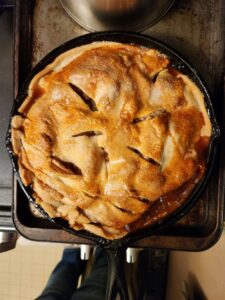
Stand Mixer Magic: Power Meets Possibility

A stand mixer is one of those kitchen appliances that feels like a luxury—until you finally own one. Then you wonder how you ever lived without it.

Like Tim Allen’s old Tool Time mantra, you can never have too much power. That’s exactly what a stand mixer brings to the party: muscle, speed, and versatility.

For years, I resisted. Stand mixers weren’t cheap, and I always had other priorities. I wasn’t a professional chef, and in my early days of living on my own, I avoided the kitchen whenever possible. A hand mixer (or plain elbow grease) got me by.

But eventually, I saw the light. A stand mixer isn’t just about baking cakes—it’s a powerhouse tool that transforms everyday cooking. Whether you’re a beginner or seasoned home cook, here are 20 ways a stand mixer can make life easier, tastier, and a whole lot more fun:


🍗 Savory Staples

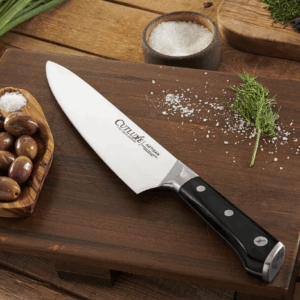
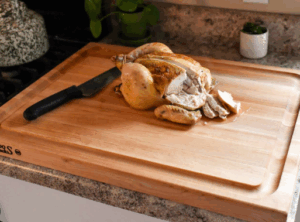
  1. Shredded Chicken – Dough hook, 20 seconds, perfect texture.
  2. Pulled Pork – Same method, barbecue bliss.
  3. Shredded Beef – Sandwich-ready without hours of hand shredding.
  4. Meatballs – Dump, mix, bake. Dinner in a flash.
  5. Meatloaf – Quick, even mixing for hearty comfort food.
  6. Hamburgers – Blend ground beef with onions, cheese, or your favorite add-ins.

🥔 Comfort Classics

  1. Mashed Potatoes – Paddle attachment, mix while hot, avoid gummy overmixing.
  2. Pizza Dough – Hands-free kneading for perfect crust.
  3. Bread – Traditional loaves without the arm workout.
  4. Cinnamon Rolls – Effortless kneading for pillowy swirls.
  5. Biscuits – Paddle cuts butter like a pro.

🍫 Sweet Treats

  1. Brownie Batter – Smooth, rich, ready to bake.
  2. Cake Batter – Light, fluffy, and foolproof.
  3. Cupcake Batter – Same magic, bite-sized joy.
  4. Cheesecake – Thorough mixing for creamy perfection.
  5. Meringue – Glossy peaks in minutes.
  6. Whipped Cream – Fresh, homemade, with endless flavor twists.
  7. Buttercream Frosting – Whip butter into silky submission.
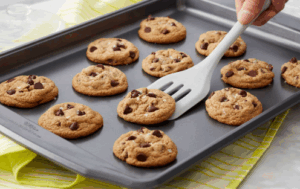
  8. Cookies – Doughs mixed evenly, no sweat.
  9. Pie Crust – Paddle “cuts in” fat for flaky layers.


🛒 Where to Find Yours

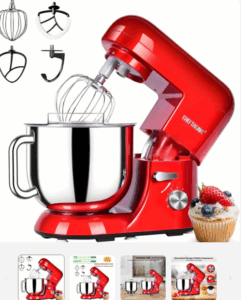
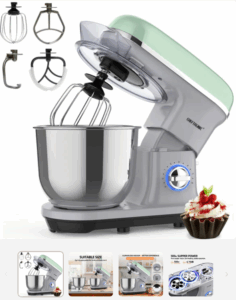
At Welcoming Haven, we feature two CHEFTRONIX Stand Mixers with attachments—perfect for everyday cooks ready to level up. For a wider selection, you can also shop through Amazon. As an Amazon affiliate, Welcoming Haven earns a small commission at no extra cost to you.

✨ Thank You for Keeping Us Cooking

Every recipe, story, and product spotlight is fueled by your support. Whether you’re exploring Around Dusty Roads for inspiration or shopping through Welcoming Haven for kitchen essentials, you help keep this creative journey alive. Thank you for being part of our table, for sharing in the joy of good food, and for helping us keep the ovens warm and the ideas simmering. Together, we’ll keep cooking up memories, meals, and a little everyday magic.

Need a Last Minute Gift Idea?

Heads up, kitchen explorers!
This post contains affiliate links, which means I may earn a small commission if you click and buy—at no extra cost to you. I only recommend tools and treasures I truly love and think you will too. Thanks for helping keep the oven warm and the creativity flowing at Around Dusty Roads and Welcoming Haven!

Why Kitchen Tools Make Great Gifts

How many times have you heard someone say, “Oh, I don’t cook”? Every gathering turns into pizza delivery or Chinese takeout. These non-cooks have never experienced the joy of serving a home-cooked meal and watching friends and family dig in with delight.

🔪 From Intimidation to Inspiration

When you’re just starting out, the kitchen can feel like a foreign land—filled with mysterious gadgets and intimidating expectations. At first, it may seem overwhelming. However, with just a few essential tools, that sense of dread can begin to fade. Before long, cooking transforms from a chore into a creative, rewarding ritual—one that brings joy, confidence, and delicious results

🧰 Essential Tools for a Welcoming Kitchen

I’m a firm believer in having the right tool for the right job. Sure, I improvise now and then—but let’s start with the basics and see if we can outfit your kitchen to become a true Welcoming Haven.


🧰 Your Starter Kitchen Toolkit

Here are my must-have essentials for any budding home cook:

  • Chef’s Knife – The MVP of the kitchen. A broad, sharp blade makes chopping, slicing, mincing, and dicing a dream. Invest in one good knife and you’ll feel like a pro. Shop here
  • Saucepan (3–4 Quart) – Look for a heavy-bottomed pan with a secure handle and tight-fitting lid. Nonstick options make cleanup a breeze. Shop here
  • Skillet – A good skillet conducts heat evenly and lasts for years. Stainless steel, cast iron, or lined copper are excellent choices. Nonstick is great for beginners. Shop here
  • Baking Sheet – Choose a sturdy, rimmed sheet made of heavy-gauge aluminum or steel. Skip nonstick here—those coatings wear out and can affect your results. Shop Here
  • Colander – Essential for draining pasta or rinsing produce. Simple, but indispensable. Shop here
  • Mixing Bowls – You can’t whip up a cake without something to mix it in! Stainless steel is durable and versatile, glass is microwave-safe, and plastic is lightweight (but can stain over time). Shop Here
  • Can Opener – Electric models are convenient, but a manual opener (like the OXO Good Grips) is a must-have—especially during power outages. Shop Here
  • Wooden Spoon & Silicone Spatula – Wooden spoons are gentle on cookware and stay cool to the touch. A silicone spatula is perfect for mixing, scraping, and folding. Shop Here
  • Peeler – More efficient (and safer) than a paring knife for many tasks. Great for potatoes, carrots, apples—you name it. Shop Here
  • Digital Kitchen Thermometer – Crucial for food safety. Don’t guess—know when your meat, poultry, or eggs are cooked to safe temperatures. Shop Here
  • Measuring Cups & Spoons – Precision matters. These tools help you follow recipes accurately and recreate your favorite dishes every time. Shop Here
  • Tongs – Protect your hands while flipping, lifting, or serving hot food. Once you have them, you’ll wonder how you cooked without them. Shop Here
  • Cutting Boards – Protect your counters and prevent cross-contamination. Use separate boards for meat, veggies, and bread for extra safety. Shop Here

🍳 Start Simple, Cook Confidently

These are my go-to essentials for anyone starting their culinary journey. Of course, there are plenty more tools you can add over time—but this kit will give you a solid foundation.

I didn’t include storage containers because most folks already have something for leftovers. But if you’re gifting, a set of glass containers or beeswax wraps makes a lovely add-on.

As Julia Child would say—Bon appétit!


Mom’s Recipe Corner Is Open—Let’s Get Cooking!


Welcoming Haven just got cozier—explore Mom’s Recipe Corner for heartwarming recipes and kitchen magic.

🥄 Mom’s Recipe Corner Is Now Open!

The oven’s warm,  we’ve tied our aprons . We’re cooking up comfort and creativity at Welcoming Haven—find your next favorite recipe in Mom’s Recipe Corner.

This cozy corner of the internet is where comfort meets creativity. So whether you’re a kitchen newbie or a seasoned home chef, rest assured—you’ll find recipes that feel like a hug from Mom: simple, soulful, and sprinkled with love.

🍲 What’s Cooking?

  • Family favorites passed down through generations
  • Seasonal delights that celebrate nature’s bounty
  • Beginner-friendly guides to empower your inner cook

We craft every recipe—from one-pot wonders to sweet treats that spark joy—with storytelling, warmth, and a dash of practical magic.

🛒 Open for Business, Open for Inspiration

We’re not just sharing recipes—we’re building a welcoming haven. Explore our curated kitchen tools, sensory gifts, and nature-inspired bundles that bring the heart of home to your table. Every product spotlight is handpicked to fit your lifestyle and elevate your everyday moments.

🌿 Come Stir Things Up With Us

Bookmark Mom’s Recipe Corner, subscribe for updates, and follow along as we whip up new favorites, bust kitchen myths, and celebrate the joy of cooking together.

Let’s make mealtime magical—one recipe at a time.


Oh That Cast Iron Skillet


🍳 Cast Iron Adventures & a Rule-Breaking Apple Pie

We’ve been busy in the kitchen lately—Skillet Meatloaf (a personal favorite), Apple Pancakes, and even a quick Skillet Lasagna. But let me be clear: tomato sauce and cast iron skillets don’t mix. The acidity can damage the seasoning. Still, it’s a great weeknight lasagna recipe—just use a different pan.

Apple Pancake


But today, we’re talking cast iron. And pie. Specifically, a skillet apple pie that made me break all my pie rules.


🥧 My Pie Rules

Before we dive in, here’s what you need to know about me:

  • I love apple pie. The only pie I love more is strawberry rhubarb.
  • My mom was a champion pie baker. We always had pie, especially around the holidays.
  • My dad and I once ate an entire apple pie by ourselves—just one more little slice at a time. It’s a family legend.
  • I don’t bake pies anymore. It’s just me, and I don’t need all those sweet calories.
  • When (if) I do bake pies, I NEVER use refrigerated pie dough. I ALWAYS make it from scratch.

So now that you know the basics… I’m about to break every single one of those rules.


🍏 Easy Skillet Apple Pie

This recipe popped up in my feed from the Southern Living Test Kitchen. I set it aside, but like a magnet to iron, I kept coming back. Eventually, I gave in and headed to the grocery store.

Granny Smith apples? No problem. Braeburn? Never heard of them. They didn’t have any, but they did have Honeycrisp and my old standby, McIntosh. According to Google, there are seven good substitutes for Braeburn. I went with the familiar—McIntosh.

Then came the refrigerated pie dough. Cue dramatic pause. I’m not a fan. I prefer flaky, tender crusts made with lard or Crisco. But I promised myself I’d follow the recipe. So… refrigerated pie dough it is.


📝 The Recipe

Ingredients:

  • 2 lbs. Granny Smith apples
  • 2 lbs. Braeburn apples (I used McIntosh)
  • 1 tsp ground cinnamon
  • ¾ cup granulated sugar
  • ½ cup butter
  • 1 cup firmly packed brown sugar
  • 1 (14 oz) package refrigerated pie crust (2 crusts)
  • 1 egg white
  • 2 Tbsp granulated sugar
  • Ice cream or sharp cheddar cheese (optional)

Directions:

Step 1: Prepare the Apples
Preheat oven to 350°F. Peel apples and cut into ½-inch wedges. Toss with cinnamon and ¾ cup granulated sugar. Set aside.

Step 2: Prepare the Crust
Melt butter in a 10-inch cast iron skillet over medium heat. Add brown sugar and stir constantly for 1–2 minutes until dissolved.
Remove from heat and place one pie crust over the brown sugar mixture.

Step 3: Add the Filling
Spoon apple mixture evenly over the crust.

Step 4: Add the Top Crust
Top with the second pie crust. Whisk egg white until foamy and brush over the top. Sprinkle with 2 Tbsp granulated sugar.
Cut 4–5 slits in the top to allow steam to escape.

Step 5: Bake
Bake at 350°F for 1 hour to 1 hour 10 minutes, or until golden brown and bubbly.
Shield with foil during the last 10 minutes if needed to prevent over-browning.
Cool on a wire rack for 30 minutes before serving.

Serve with ice cream or a slice of sharp cheddar cheese.


🧼 Notes & Tips

  • Use a drip pan or line the bottom of your oven with foil—this pie bubbles over, and cleanup without protection is no fun.
  • Surprisingly, the tougher refrigerated crust holds up well against the gooey filling.

Now I’m stuck with a delicious 10-inch apple pie. Guess I’ll just have to take one for the team. I’m going to enjoy every bite—and I hope you do too.


🍂 Welcoming Haven Picks (Affiliate Links)

If you’re inspired to try this recipe, here are a few cozy kitchen picks from Welcoming Haven that fit right in:

As an affiliate, I may earn a small commission if you make a purchase through these links—thank you for supporting Around Dusty Roads and Welcoming Haven!


Turkey Ring


A Cozy Twist on Thanksgiving: The Turkey Ring

I was cruising through Facebook, checking in on my Welcoming Haven ads, when a video caught my eye—something about Thanksgiving leftovers. Intrigued, I paused my scroll and gave it a watch. What unfolded was a delightfully clever idea that instantly sparked my curiosity. Why wait for leftovers? Since it’s just me this year, I thought, why not make my entire Thanksgiving dinner this way?

So without further ado, let me introduce you to the Turkey Ring—a simple, savory, and oh-so-satisfying dish that wraps all the classic flavors of Thanksgiving into one golden-brown bundle.

My first Try


How to Make It

Start by placing a can of cranberry sauce in the center of a sheet pan. The video used a round pizza pan, but I made do with a cookie sheet—use what you have! Then, open a can of Pillsbury crescent rolls and arrange the dough around the cranberry can in a starburst pattern. The wide ends should point inward, overlapping slightly around the center.

the layout

Now comes the fun part: on each triangle, layer a small spoonful of stuffing, a slice of cranberry sauce, and a piece of turkey. Fold the narrow end of the dough over the filling and tuck it underneath to secure. Brush the tops with a light egg wash for that irresistible golden finish.

Bake at 375°F, following the crescent roll instructions, until the ring is puffed and beautifully browned. Be sure you remove the cranberry sauce can before you put the ring in the oven

The Grand Finale

Once it’s out of the oven, place a small bowl of warm gravy in the center. The result? A stunning centerpiece that’s as tasty as it is charming. Just slice, dip, and enjoy!

The Professional


Whether you’re flying solo or feeding a small crowd, this Turkey Ring is a festive way to savor the season—with minimal fuss and maximum flavor.

Need to watch the video? Click here

Credit Home Hacks and Easy Snacks