The Joy of Cooking (and Why the Right Tools Matter)

The Joy of Cooking (and Why the Right Tools Matter)

When I was a kid, there was always a big red cookbook in the house—The Joy of Cooking. My grandmother cooked at a resort on Lake George, NY. My mom wasn’t a professional, but she was a fantastic cook.

Me? I wanted nothing to do with the kitchen. Good food just seemed to appear like magic, so why would I bother learning?

The Big Surprise

That changed the day I moved out on my own. Suddenly, food didn’t just appear—and I quickly learned that The Joy of Cooking wasn’t just in a book. It was in the process: combining ingredients, watching them turn into something delicious, and sharing it with people you love.

And here’s the secret I wish I’d learned sooner: having the right tools makes everything easier—whether you’re cooking, sewing, or painting.

Why Tools Matter

  • A paring knife instead of a steak knife? Game changer.

  • A lid that actually fits the pot? Total revelation.

  • The right baking pan? It can make or break your brownies.

Sure, you can make popovers in a muffin tin, but they won’t be those light, airy, high-rising beauties. And yes, brownies baked in the wrong size pan will still taste good—but maybe not “bring to the potluck” good.

My Stir Fry Upgrade

One of my favorite quick meals is stir fry. For years, I made it in a cast iron skillet, and it was fine. Then one Christmas, my sister gave me a wok. Wowza! Total game-changer.

Here’s my tip: before you start, prep everything. Stir fry moves fast, and you don’t want to be chopping garlic while your chicken is burning. Switching to a wok not only sped up my cooking—it made every bite taste better.


Chicken and asparagus stir fry in a savory brown sauce.


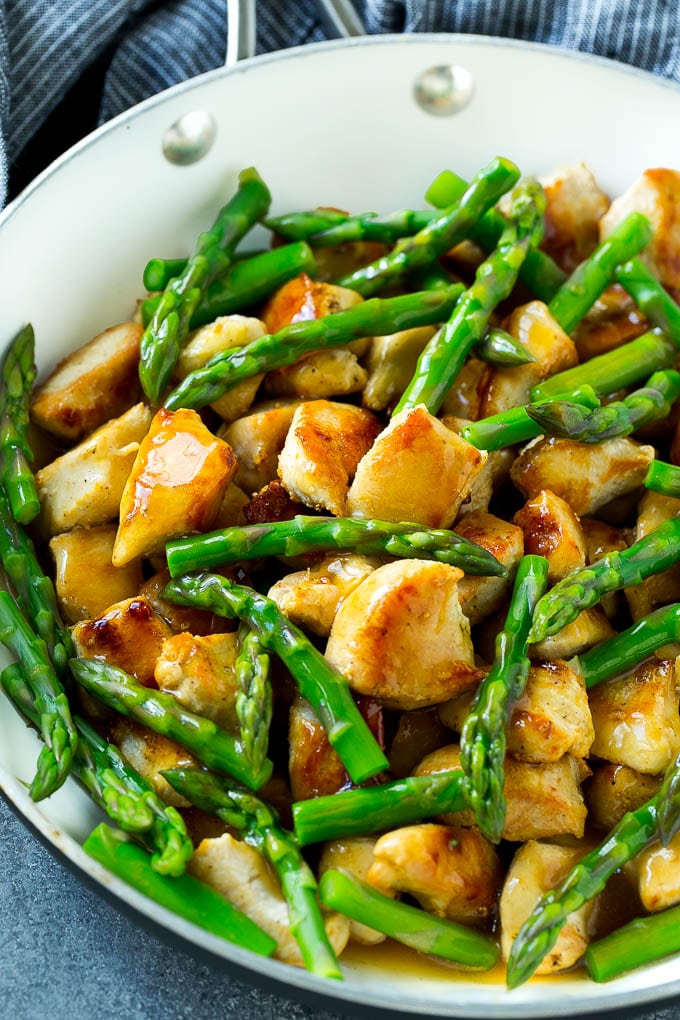
Recipe: Chicken & Asparagus Lemon Stir Fry

Serves: 4
Time: About 20 minutes

Ingredients

  • 1 ½ lbs skinless chicken breast, cut into 1-inch cubes
  • Kosher salt, to taste
  • ½ cup chicken broth
  • 2 tbsp soy sauce
  • 2 tsp cornstarch
  • 2 tbsp water
  • 1 tbsp vegetable oil (such as canola)
  • 1 bunch fresh asparagus, trimmed & cut into 2-inch pieces
  • 6 cloves garlic, chopped
  • 1 tbsp fresh ginger, chopped
  • 3 tbsp fresh lemon juice
  • Black pepper, to taste (I like coarse-ground)

Directions

  1. Season chicken lightly with salt. In one bowl, mix chicken broth + soy sauce. In another, whisk cornstarch + water until smooth.
  2. Heat a large nonstick wok over medium-high. Add 1 tsp oil + asparagus. Cook 3–4 min until tender-crisp. Add garlic + ginger, cook 1 min. Remove and set aside.
  3. Increase heat to high. Add 1 tsp oil + half the chicken; cook 4 min per side until browned. Remove and repeat with remaining chicken + oil.
  4. Add soy sauce mixture to wok; boil 1½ minutes. Stir in lemon juice + cornstarch mix until slightly thickened.
  5. Return chicken + asparagus to wok; toss well. Serve hot.

Where to Find a Good Wok

Easy Clean Wok- available through Welcoming Haven.com


You can find woks in the kitchen section at Welcoming Haven. If theirs don’t fit your needs, check my affiliate link to Amazon for a wider selection.

And if you try this recipe—tag me or drop a comment. I’d love to know how it turned out!


Popovers

Popovers

The first Popover I ever ate was at Anthony’s Pier  4 restaurant.

Anthony’s Pier 4

Once I had one of these piping hot pastries I was hooked. I’d go to lunch at Anthony’s any time I could get an invitation. Served piping hot from the oven theses tender puffed pastries are heaven. Sadly Anthony’s closed in 2013 so if I want to indulge I have no choice but to learn to make them myself!

What are These Tasty Treats

A popover is a light American pastry made from an egg batter similar to that of Yorkshire pudding, typically baked in muffin tins or dedicated popover pans, which have straight-walled sides rather than angled. Now I suppose you’ll ask me what a Yorkshire Pudding is. I can tell you it is not a pudding.

A Yorkshire Pudding is an English side dish that is made from a simple 4 ingredient batter and cooked in hot beef drippings (or oil) in the oven until puffed and crispy on the outside and tender on the inside. It’s basically the English equivalent of a dinner roll in North America. Extremely similar to a popover

Where there’s smoke …

The first thing I did was order 2 popover pans from Amazon.

Sponsored Ad - Chicago Metallic Professional 6-Cup Popover Pan with Armor-Glide Coating

The 2nd thing was to research Popover recipes. They are all pretty similar and simple. Basically eggs, milk and flour. 

The thing that gave me issues was that you need to put a pat of butter in the pan and then put the pan in a 400 degree oven. Butter has a low smoking point and I set off the smoke alarms every time. The popovers tasted great but the noise level was unacceptable.  Maybe you can only make popovers in a commercial oven?  Sadly I decided to retire my Popover pans.

A New Recipe

Then one day I stumbled over a new Popover Recipe. It even came with a video. The main difference is that you add the butter to the popover pan after they are hot so the butter melts but doesn’t sit in a hot oven so no smoke.

Ingredients

  • 3 eggs (room temperature)
  • 1 Cup Milk ( room temperature)
  • 3 Tbsps. Oil ( Canola oil recommended)
  • 1 Cup all purpose flour
  • 1/2 teaspoon kosher salt

Directions

  1. Preheat oven to 400 degrees
  2. While preparing batter  spray popover pan with non-stick cooking spray and place in oven to heat.
  3. Whisk eggs, milk and oil together. Sift flour and add to egg mixture. Add Salt and beat mixture until smooth and free of any lumps.
  4. Remove Popover pan from oven and place a small bit of butter in each popover cup. 
  5. Pour batter 3/4 of the way full in to each Popover Cup. 
  6. Place filled pan into the 400 degree oven and bake for 30 minutes
  7. Reduce heat to 325 degrees and bake for additional 5-15 minutes (Keep an eye on your popovers)
  8. Popovers are done when they are a nice, golden brown.
  9. Serve hot with butter or jam or whatever you desire

Success!

I’m happy to report my Popovers were a complete success. I think I’ll be making them often now. 

Popovers- photo by Deb Neumann


Rainbows and Leprechauns

Happy Belated St Paddy’s Day- All Rainbows and Leprechauns

3,800+ Leprechaun Rainbow Stock Photos, Pictures & Royalty ...

Leprechaun Rainbow Stock Photos

I hope your day was filled with Rainbows, pots of gold and Leprechauns. Did you do anything to celebrate? A pint of Guinness or just a green beer?. I made beef stew. Its not quite Irish stew but close. What is the difference between classic beef stew and Irish stew?  According to the internet its all in the meat.  Traditional Irish Stew uses  lamb (mutton) while beef uses, well, beef. 

a very cute and adorable few day old lamb

Lamb stock photo

59,500+ Beef Cattle Stock Photos, Pictures & Royalty-Free ...

Beef Cattle Stock Photos,

I love making stew since we have slow cookers now and I confess, I often cheat by using the McCormick Slow Cooker Beef  Stew seasoning packets.  I’ve found it keeps the prep simple and the flavor consistent. But whether I make it from scratch with beef broth and seasonings or use the packets one step I never skip is browning the stew meat.

I dump all those little meat cubes in a plastic bag with flour, salt and pepper and give them a good shake to coat. Then I toss them into a hot cast iron pan and brown the sides.  Once they are all browned up into the crock pot they go.  (By the way, I started using a liner and it makes clean up a breeze. )

My mom used to add a can of Veg All but I just chop up celery, carrots and onions and lots of potatoes. Any kind will do but I like the Yukon gold the best for my stew.

Beef Stew- Photo credit Deb Neumann

Basic Beef Stew Recipe

INGREDIENTS:

  • 2 lbs beef stew meat , cut in 1 inch pieces
  • 1/4 cup all purpose flour
  • 1/2 teas. salt
  • 1/2 teas ground black pepper
  • 1 1/2 Cups beef broth
  • 4 medium carrots, sliced
  • 3 medium potatoes, diced
  • 1 medium onion , chopped
  • 1 stalk of celery, chopped
  • 1 bay leaf

INSTRUCTIONS:

  1. Place the meat in a plastic bag or large bowl and coat with flour, salt and pepper
  2.  Brown the floured meat and place in your crock pot/ slow cooker
  3.  Add Broth, Vegetables and bay leaf to the slow cooker.  Stir to combine.
  4.  Set Slow Cooker. Cover and cook on low for 8-12 hours or high for 4-6 hours. 

NOTES

  1. You can add other seasonings to taste like garlic, paprika, a dash of Worcestershire sauce for example. Like I mentioned above, My mom always added a can of Veg-All. 
  2.  I’ve used the low setting and the high settings and I have the best luck for tender, fall apart meat with the low setting. Long and slow wins in my house every time but when time is an issue I’d rather use high and a shorter cook time than go without.
  3.   AS mentioned above, the McCormick Slow Cooker Beef Stew Seasoning packets produce a consistently flavored stew and are easy to use and you don’t need the beef broth when you use them. Just water


Hope You all Had a great day!

A Pot of Gold Articles - Analyzing Metals

A Pot of Gold- Internet


Crepes or Pancakes

Crepes or Pancakes

I am so proud of myself. I made crepes for the first time about a week ago. I’d never tried to make these skinny pancakes and don’t know what made me decide to try but I am happy to report they were a success. Now this comes from someone who has never, ever been able to make a decent pancake. (Unless it’s an apple pancake

Apple Pancake- Photo credit Deb Neumann

Pancakes are supposed to be easy right? Well I have never been successful. I finally settled on super fat (thick)  Bisquick  pancakes or a trip to IHop for my pancake fix. Then I saw an episode on Food Network about pancakes and it’s been percolating in the back of my mind. After all if I can make a successful crepe I should be able to make pancakes, right?

The Crepes

I think of crepes as a breakfast food so I made my first ones Strawberry but I think  next time I will go for savory instead of sweet. Maybe stuff them with sausage and eggs.  

Photo credit Deb Neumann


The recipe was very simple and easy. From Allrecipes.com

Basic Crepes

Prep time- 10 minutes

Cook time 20 minutes (Mine was less)

Total Time 30 minutes

Ingredients

  • 1 Cup All Purpose flour
  • 2 large eggs
  • 1/2 Cup milk
  • 1/2 Cup water
  • 1/4 teaspoon salt
  • 2 Tablespoons butter , melted

Directions

  1. Whisk flour and eggs together in a large mixing bowl. Gradually add in milk and water, stirring to combine. Add Salt and melted butter. Beat until smooth.
  2. Heat a lightly oiled griddle or frying pan over medium-high heat. Pour or scoop the batter onto the griddle using approximately 1/4 cup of batter for each crepe. Tilt the pan with a circular motion so the batter coats the surface evenly.
  3. Cook until the top of the crepe is no longer wet and the bottom has turned light brown. 1-2 minutes. Run a spatula around the edge of the crepe to loosen and flip to cook the other side. About a minute more. Serve hot.

Pancakes for One

Photo Credit Deb Neumann

Recipe from One dish kitchen

With a successful crepe experience behind me I moved on to my nemesis, pancakes. I was really brave too. I didn’t even use a mix! Pancakes from scratch coming up and wonder of wonders, they were good!

Prep Time- 5 minutes   Cook time – 10 minutes  Total time – 15 minutes

Ingredients

  • 1 Cup all purpose flour
  • 1 teaspoon baking powder
  • 1/2 Tablespoon sugar
  • 1/4 teaspoon salt
  • 1 large egg
  • 3/4 Cup Milk
  • 1/4 teaspoon vanilla extract 
  • 1 Tablespoon salted butter (melted)
  • 1 teaspoon salted butter for the pan/griddle

Directions

  1. In a large bowl whisk together the flour, baking powder, sugar and salt.
  2. In another bowl beat the egg and then whisk in the milk, vanilla and melted butter
  3. Pour wet ingredients into dry ingredients and mix until just incorporated. Lumps are ok. If the batter is too thick add more milk a little at a time.
  4. Melt Butter in a large skillet or griddle over medium heat.
  5. Ladle about 3/4 cup of batter onto the skillet to make a pancake
  6. Cook until bubbles break the surface of the pancake and the underside is golden brown (about 3 minutes)
  7. Flip with a spatula and cook about 1 minutes more on the 2nd side.
  8. Repeat until the batter is used up.

Even with this scaled down recipe there was more batter than I needed for just me. I made two pancakes for me and probably had enough batter left for 3 or 4 more. 

So which one do you want to try first?


Enjoy- They are yummy!

Thoughts About Cornbread

Some Thoughts on Cornbread


May be an image of text that says 'The North thinks it knows how to make corn bread, but this is a gross SuPerstition. Perhaps no bread in the world is quite as good as Southern corn bread, and Perhaps no bread in the world is quite as bad as the Northern imitation of it. Mark Twain Sonthern THE Voice'


I think Mark Twain got this right. I don’t think I’ve ever had true Southern Cornbread but I’ve had some pretty awful cornbread here in the North. Maybe my sister in law and I should have a cornbread bake off. My sister-in -law is from Charleston, South Carolina and is one of the most fun people I know.  But I digress.

Cornbread is something I don’t eat very often but every once in a while I get a craving for it. When I was working I’d buy the little mix packages that were just add water. Although easy and quick to make the result was  this dry, crumbly stuff that was really pretty bad.  Still bad cornbread is better than no corn bread so I kept doing that until someone gave me a recipe for Boston Market Cornbread. I’m always looking for ways to improve my cooking skills.

Boston Market Cornbread

Boston Market cornbread is a very moist, very sweet, cornbread that is served as a mini loaf.

No photo description available.

Photo credit- Boston Market

I think they are great but is it cornbread? 

When I got the “Imposter” recipe I could see why it’s so cake like. It uses a box of Butter Cake mix as a base. It makes a ton of these little loaves and they also freeze well. I used to make a batch for the office and we’d put them in the freezer so my co-workers and I could have them whenever we wanted.  

Cast Iron Skillet Corn Bread

Boston Market cornbread aside, I still think there is nothing like cornbread that’s baked in a cast iron skillet. You get such a beautiful crust when you bake your cornbread this way. So  I set out to see if I could make a decent cornbread even though I am a Northerner. I think my effort was pretty successful. Here’s the result. 

Photo credit Deb Neumann


Photo Credit- Deb Neumann


Photo credit- Deb Neumann

Cast Iron Skillet Corn Bread Recipe

(Food Network)


Ingredients

  • 1 1/4 cups yellow cornmeal
  • 3/4 cup all-purpose flour
  • 1/4 cup granulated sugar
  • 1 teas. kosher salt
  • 2 teas. baking powder
  • 1/2 teas. baking soda
  • 1/3 cup whole milk
  • 1 cup buttermilk
  • 2 eggs (lightly beaten)
  • 8 Tablespoons unsalted butter, Melted

Directions

  1. Preheat oven to 425 degrees F, and place a 9 inch cast iron skillet inside to heat while you make the batter.
  2. In a large bowl, whisk together the cornmeal, flour, sugar, salt baking powder and baking soda. Whisk in the milk, buttermilk, and eggs. Lastly whisk in all of the melted butter, reserving about 1 tablespoon for the skillet later on.
  3. Carefully remove the hot skillet from the oven and reduce the oven temp to 375. Coat bottom and sides of the hot skillet with the remaining butter. Pour the batter into the skillet and place it in the center of the oven. Bake until the center is firm and tooth pick inserted in the center comes out clean.  (25-30 minutes) Allow to cool 10-15 minutes before cutting and serving. 

Enjoy!